目录
前言
在讲述AV Foundation框架之媒体捕捉。我将用一个小案例来开始整个知识点的引导以及疏通。我就不一一赘述相关的UI实现了。关于UI搭建部分,同学们可以在本篇文章末尾拿到百度网盘分享。你就可以在这个基础上进行编码了。
创建预览视图
下图是项目的用户界面的组成图示。我们把重点放在中间层THPreview View的实现上。因为它直接包含了AV Foundation 的用户界面。
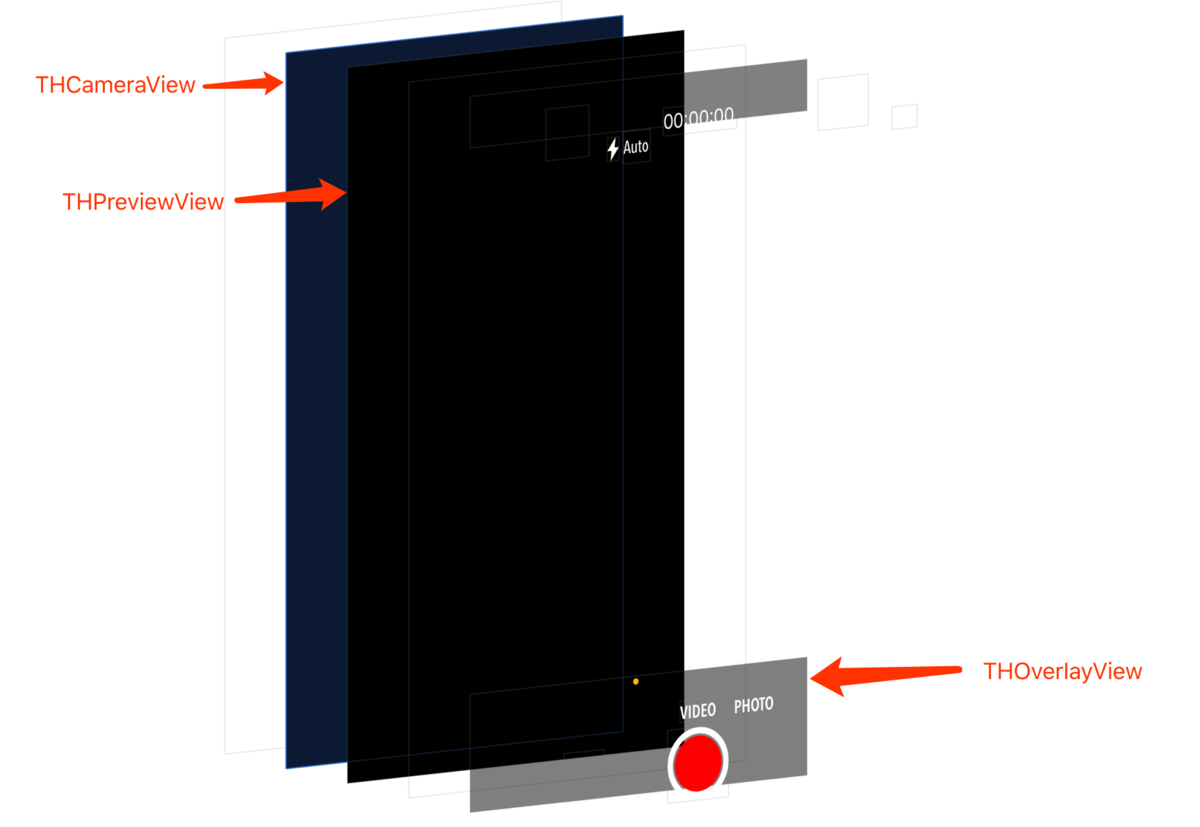
图所示的THPreview View 类提供给用户用i 个摄像头当前拍摄内容的实时预览图。我们将使用AVCaptureVideoPreviewLayer方法实现这个行为。首先我们通过认识THPreview View 的接口开始了解如何实现。
一、THPreviewView 接口
#import <AVFoundation/AVFoundation.h>

@protocol THPreviewViewDelegate <NSObject>
- (void)tappedToFocusAtPoint:(CGPoint)point;//聚焦
- (void)tappedToExposeAtPoint:(CGPoint)point;//曝光
- (void)tappedToResetFocusAndExposure;//点击重置聚焦&曝光
@end

@interface THPreviewView : UIView

//session用来关联AVCaptureVideoPreviewLayer 和 激活AVCaptureSession
@property (strong, nonatomic) AVCaptureSession *session;
@property (weak, nonatomic) id<THPreviewViewDelegate> delegate;

@property (nonatomic) BOOL tapToFocusEnabled; //是否聚焦
@property (nonatomic) BOOL tapToExposeEnabled; //是否曝光

@end
二、 THPreviewView 实现
#import "THPreviewView.h"
#import "NSTimer+Additions.h"

#define BOX_BOUNDS CGRectMake(0.0f, 0.0f, 150, 150.0f)

@interface THPreviewView ()
@property (strong, nonatomic) UIView *focusBox;
@property (strong, nonatomic) UIView *exposureBox;
@property (strong, nonatomic) NSTimer *timer;
@property (strong, nonatomic) UITapGestureRecognizer *singleTapRecognizer;
@property (strong, nonatomic) UITapGestureRecognizer *doubleTapRecognizer;
@property (strong, nonatomic) UITapGestureRecognizer *doubleDoubleTapRecognizer;
@end

@implementation THPreviewView

- (id)initWithFrame:(CGRect)frame {
    self = [super initWithFrame:frame];
    if (self) {
        [self setupView];
    }
    return self;
}

- (id)initWithCoder:(NSCoder *)coder {
    self = [super initWithCoder:coder];
    if (self) {
        [self setupView];
    }
    return self;
}

+ (Class)layerClass {
    //在UIView 重写layerClass 类方法可以让开发者创建视图实例自定义图层了下
    //重写layerClass方法并返回AVCaptureVideoPrevieLayer类对象
    return [AVCaptureVideoPreviewLayer class];
}

- (AVCaptureSession*)session {
    //重写session方法,返回捕捉会话
    return [(AVCaptureVideoPreviewLayer*)self.layer session];
}

- (void)setSession:(AVCaptureSession *)session {
    //重写session属性的访问方法,在setSession:方法中访问视图layer属性。
    //AVCaptureVideoPreviewLayer 实例,并且设置AVCaptureSession 将捕捉数据直接输出到图层中,并确保与会话状态同步。
    [(AVCaptureVideoPreviewLayer*)self.layer setSession:session];
}


//关于UI的实现,例如手势,单击、双击 单击聚焦、双击曝光
- (void)setupView {

    [(AVCaptureVideoPreviewLayer *)self.layer setVideoGravity:AVLayerVideoGravityResizeAspectFill];

    _singleTapRecognizer =
    [[UITapGestureRecognizer alloc] initWithTarget:self action:@selector(handleSingleTap:)];

    _doubleTapRecognizer =
    [[UITapGestureRecognizer alloc] initWithTarget:self action:@selector(handleDoubleTap:)];
    _doubleTapRecognizer.numberOfTapsRequired = 2;

    _doubleDoubleTapRecognizer =
    [[UITapGestureRecognizer alloc] initWithTarget:self action:@selector(handleDoubleDoubleTap:)];
    _doubleDoubleTapRecognizer.numberOfTapsRequired = 2;
    _doubleDoubleTapRecognizer.numberOfTouchesRequired = 2;

    [self addGestureRecognizer:_singleTapRecognizer];
    [self addGestureRecognizer:_doubleTapRecognizer];
    [self addGestureRecognizer:_doubleDoubleTapRecognizer];
    [_singleTapRecognizer requireGestureRecognizerToFail:_doubleTapRecognizer];

    _focusBox = [self viewWithColor:[UIColor colorWithRed:0.102 green:0.636 blue:1.000 alpha:1.000]];
    _exposureBox = [self viewWithColor:[UIColor colorWithRed:1.000 green:0.421 blue:0.054 alpha:1.000]];
    [self addSubview:_focusBox];
    [self addSubview:_exposureBox];
}

- (void)handleSingleTap:(UIGestureRecognizer *)recognizer {
    CGPoint point = [recognizer locationInView:self];
    [self runBoxAnimationOnView:self.focusBox point:point];
    if (self.delegate) {
        [self.delegate tappedToFocusAtPoint:[self captureDevicePointForPoint:point]];
    }
}

//私有方法 用于支持该类定义的不同触摸处理方法。 将屏幕坐标系上的触控点转换为摄像头上的坐标系点
- (CGPoint)captureDevicePointForPoint:(CGPoint)point {
    AVCaptureVideoPreviewLayer *layer =
        (AVCaptureVideoPreviewLayer *)self.layer;
    return [layer captureDevicePointOfInterestForPoint:point];
}

- (void)handleDoubleTap:(UIGestureRecognizer *)recognizer {
    CGPoint point = [recognizer locationInView:self];
    [self runBoxAnimationOnView:self.exposureBox point:point];
    if (self.delegate) {
        [self.delegate tappedToExposeAtPoint:[self captureDevicePointForPoint:point]];
    }
}

- (void)handleDoubleDoubleTap:(UIGestureRecognizer *)recognizer {
    [self runResetAnimation];
    if (self.delegate) {
        [self.delegate tappedToResetFocusAndExposure];
    }
}
- (void)runBoxAnimationOnView:(UIView *)view point:(CGPoint)point {
    view.center = point;
    view.hidden = NO;
    [UIView animateWithDuration:0.15f
                          delay:0.0f
                        options:UIViewAnimationOptionCurveEaseInOut
                     animations:^{
                         view.layer.transform = CATransform3DMakeScale(0.5, 0.5, 1.0);
                     }
                     completion:^(BOOL complete) {
                         double delayInSeconds = 0.5f;
                         dispatch_time_t popTime = dispatch_time(DISPATCH_TIME_NOW, (int64_t)(delayInSeconds * NSEC_PER_SEC));
                         dispatch_after(popTime, dispatch_get_main_queue(), ^(void){
                             view.hidden = YES;
                             view.transform = CGAffineTransformIdentity;
                         });
                     }];
}

- (void)runResetAnimation {
    if (!self.tapToFocusEnabled && !self.tapToExposeEnabled) {
        return;
    }
    AVCaptureVideoPreviewLayer *previewLayer = (AVCaptureVideoPreviewLayer *)self.layer;
    CGPoint centerPoint = [previewLayer pointForCaptureDevicePointOfInterest:CGPointMake(0.5f, 0.5f)];
    self.focusBox.center = centerPoint;
    self.exposureBox.center = centerPoint;
    self.exposureBox.transform = CGAffineTransformMakeScale(1.2f, 1.2f);
    self.focusBox.hidden = NO;
    self.exposureBox.hidden = NO;
    [UIView animateWithDuration:0.15f
                          delay:0.0f
                        options:UIViewAnimationOptionCurveEaseInOut
                     animations:^{
                         self.focusBox.layer.transform = CATransform3DMakeScale(0.5, 0.5, 1.0);
                         self.exposureBox.layer.transform = CATransform3DMakeScale(0.7, 0.7, 1.0);
                     }
                     completion:^(BOOL complete) {
                         double delayInSeconds = 0.5f;
                         dispatch_time_t popTime = dispatch_time(DISPATCH_TIME_NOW, (int64_t)(delayInSeconds * NSEC_PER_SEC));
                         dispatch_after(popTime, dispatch_get_main_queue(), ^(void){
                             self.focusBox.hidden = YES;
                             self.exposureBox.hidden = YES;
                             self.focusBox.transform = CGAffineTransformIdentity;
                             self.exposureBox.transform = CGAffineTransformIdentity;
                         });
                     }];
}

- (void)setTapToFocusEnabled:(BOOL)enabled {
    _tapToFocusEnabled = enabled;
    self.singleTapRecognizer.enabled = enabled;
}

- (void)setTapToExposeEnabled:(BOOL)enabled {
    _tapToExposeEnabled = enabled;
    self.doubleTapRecognizer.enabled = enabled;
}

- (UIView *)viewWithColor:(UIColor *)color {
    UIView *view = [[UIView alloc] initWithFrame:BOX_BOUNDS];
    view.backgroundColor = [UIColor clearColor];
    view.layer.borderColor = color.CGColor;
    view.layer.borderWidth = 5.0f;
    view.hidden = YES;
    return view;
}

@end
坐标空间转换
//私有方法 用于支持该类定义的不同触摸处理方法。 将屏幕坐标系上的触控点转换为摄像头上的坐标系点
- (CGPoint)captureDevicePointForPoint:(CGPoint)point {
    AVCaptureVideoPreviewLayer *layer =
        (AVCaptureVideoPreviewLayer *)self.layer;
    return [layer captureDevicePointOfInterestForPoint:point];
}
当使用AV Foundation 的捕捉API时,一定要理解屏幕坐标系和捕捉设备坐标系不同。iOS6.0之前的版本,要在这2个坐标空间进行转换非常困难。要精确的将屏幕坐标点转换为摄像头坐标点。开发者必须考虑诸如视频重力、镜像、图层变换和方向等因素进行综合计算。幸运的是,AVCaptureVideoPreviewLayer现在定义了一个转换方法让这一过程变得简单多了。
AVCaptureVideoPreviewLayer定义了2个方法用于坐标系间进行转换:
captureDevicePointOfInterestForPoint:获取屏幕坐标系的CGPoint 数据,返回转换得到的设备坐标系CGPoint数据。
pointForCaptureDevicePointOfInterest:获取摄像头坐标系的CGPoint数据,返回转换得到的屏幕坐标系CGPoint 数据。
THPreview View 使用captureDevicePointOfInterestForPoint:方法将用户触点信息转换为摄像头设备坐标系的中的点。在项目中点击对焦和点击曝光功能实现会用到这个转换坐标点。
总结
学习这篇文章重点,要弄明白预览视图的创建 和 坐标空间转换的方法。
链接:此链接下的项目已经搭建好UI。同学们,可以在这个基础上进行编码;
链接:http://pan.baidu.com/s/1c1A1NDA 密码:ca7o
行者常至,为者常成!