
目录
主要配置文件介绍
官方文档: 应用配置文件(Stage模型) 配置文件
一、app.json5
文件位置:
工程根目录/AppScope/app.json5
作用:
应用的全局配置信息,包含应用的Bundle名称、版本号、开发厂商等基本信息。
二、module.json5
位置:
工程根目录/entry/src/main/module.json5
作用:
Module的基本配置信息,包含Module名称、类型、描述、支持的设备类型等基本信息。
应用组件信息,包含UIAbility组件和ExtensionAbility组件的描述信息。
应用运行过程中需要的权限信息。
三、工程级build-profile.json5
位置:
工程根目录/build-profile.json5
作用:
应用构建所需配置信息,包括应用名、SDK版本、签名等。
四、模块级build-profile.json5
位置:
工程根目录/entry/build-profile.json5
作用:
模块构建所需配置信息
注意:
1、有时同一个配置项既存在于工程级配置文件内,也存在于模块级配置文件内,同时配置的话一般模块级内的优先级高。
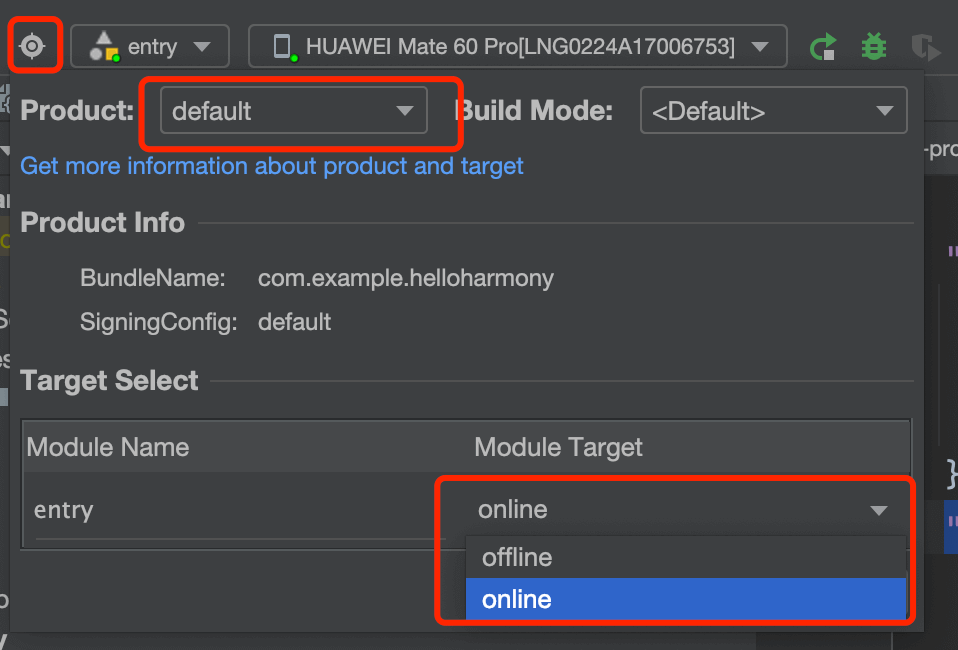
2、如果不是有多个版本的产品比如国际版,国内版这样的app,建议颗粒度控制在target级别,也就是在模块级别的build-profile.json5文件中配置target选项,而不要在工程级别的build-profile.json5文件中配置product选项。
product与target
一、product
product:比如国际版,国内版,就是product这个颗粒度
每一个product对应一个定制的APP包(这么描述感觉不太准确)
signingConfig 和 bundleName 是针对product进行配置的。
一个product可以配置多个target
以上的信息在工程级的build-profile.json5中配置
{
  "products": [
    {
      "name": "default",
      "signingConfig": "default",
      "compatibleSdkVersion": "5.0.2(14)",
      "runtimeOS": "HarmonyOS",
      "buildOption": {
        "strictMode": {
          "caseSensitiveCheck": true,
          "useNormalizedOHMUrl": true
        }
      }
    }
  ]
}
二、target
target:比如测试环境、生产环境就是target这个颗粒度
每个target对应一个HAP(这么描述感觉不太准确)
Target需要包含在定义的Product中才能选择,一个target可以被包含在多个product中
每个target可以单独指定资源目录,不同的资源目录内资源的名字要保持一致,这样不同的target就会加载不同的资源。
模块级别:build-profile.json5文件内配置:
{
  "targets": [
    {
      "name": "offline",//测试版本
      "resource": {  //定义target使用的资源文件目录,该功能在API 9及以上版本的工程中生效
        "directories": [
          "./src/main/resources_offline",//数组内排位靠前的优先级高
          "./src/main/resources"
        ]
      },
      "source": {
        "abilities": [
          {
            "name": "EntryAbility",
            "icon":"$media:layered_image",
            "label":"$string:EntryAbility_label",
            "launchType": "singleton"
          }
        ]
      }
    },
    {
      "name": "online",  //生产版本
      "resource": {
        "directories": [
          "./src/main/resources_online",
          "./src/main/resources"
        ]
      }
    }
  ]
}
有一点需要注意:
在resources_online中存在的资源,在resources中也要有一份,否则在 Build -> Build HAP(s)/APP(s)时可能会报错。
模块级别:在module.json文件内 -> module -> abilities 下也可以配置 icon 和 label
xy:跟build-profile.json5的优先级低
单独指定target的ability的page。
{"module": {
    "abilities": [
      {
        "name": "EntryAbility",
        "srcEntry": "./ets/entryability/EntryAbility.ets",
        "description": "$string:EntryAbility_desc",
        "icon": "$media:layered_image",
        "label": "$string:EntryAbility_label",
        "startWindowIcon": "$media:startIcon",
        "startWindowBackground": "$color:start_window_background"
      }
    ]
  }
}
三、product和target的关系配置
以上的信息在工程级的build-profile.json5中配置
{
  "modules": [
    {
      "name": "entry",
      "srcPath": "./entry",
      "targets": [
        {
          "name": "offline",
          "applyToProducts": [
            "default"
          ]
        },
        {
          "name": "online",
          "applyToProducts": [
            "default"
          ]
        }
      ]
    }
  ]
}
配置完成之后
为不同的product和target配置不同的资源
一、为不同的product配置不同的app_name和app_icon
1、为不同的product创建不同的资源目录
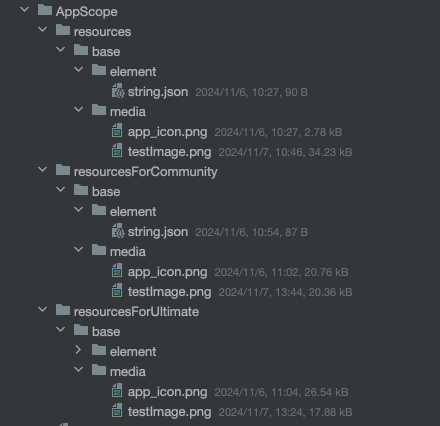
2、需要在工程级别的build-profile.json5中指定资源目录,如下:
{
    "app":{
      "products": [
        {
          "name": "Ultimate",
          "icon": "$media:app_icon",
          "label": "$string:app_name",
          "resource": {
            "directories": [
              "./AppScope/resourcesForUltimate"
            ]
          }
        }
      ]
    }
}
二、为不同的target配置不同的app_name和app_icon
1、为不同的target创建不同的资源目录
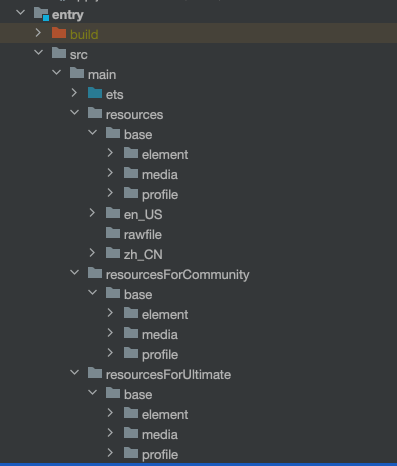
2、需要在模块级别的build-profile.json5中指定target的资源目录,如下:
{
  "targets":[
    {
      "name": "vip",
      "resource": {
        "directories": [
          "./AppScope/resourcesForUltimate"
        ]
      }
    }
  ]
}
3、需要在模块级别的module.json文件内 -> module -> abilities 下的 icon和label 为target指定icon和label,如下:
{
  "module": {
    "abilities": {
      "icon": "$media:layered_image",
      "label": "$string:EntryAbility_label"
    }
  }
}
三、注意
1、不同资源目录下的资源名字要保持一致。
2、module.json5文件内显示名称和图标的配置会覆盖工程级别的build-profile.json5文件内的配置。
3、模块内的不同的两个target如果有相同的资源可以按照下面这样配置
{
  "targets":[
    {
      "name": "vip",
      "resource": {
        "directories": [
          "./AppScope/resourcesForUltimate",
          "./src/main/resources"
        ]
      }
    },
    {
      "name": "free",
      "resource": {
        "directories": [
          "./src/main/resourcesForCommunity",
          "./src/main/resources"
        ]
      }
    }
  ]
}
将共有的资源放置在resources目录下。
提醒:工程级别的资源目录配置这样配置貌似没有生效,可以在多做做实践
4、资源的优先级问题
在代码中使用资源时如下书写
Image($r("app.media.testImage")).width(56).height(56)
按道理讲:模块级别的同名资源会高于工程级别的同名资源使用。但在页面内访问资源时,同名资源同时存在与工程级别和模块级别的资源目录时,资源会显示工程级别的资源。
比如:在工程级别和模块级别的resourcesForCommunity下都存在testImage.png。会显示工程级别下的testImage.png。
工程级别的resourcesForCommunity下没有资源时,才会去模块级别的resourcesForCommunity下加载testImage.png。
编译app和hap
在菜单栏的Build -> Build Hap(s)App(s) -> Build Hap(s)
编译产物会出现在模块目录下:entry/build/Community/outputs
在菜单栏的Build -> Build Hap(s)App(s) -> Build App(s)
编译产物会出现在工程目录下:build/outputs
如何获取编译参数
一、获取和使用编译参数
Build -> Build HAP(s)/APP(s) 编译后会在build的目录下生成BuildProfile.ets文件
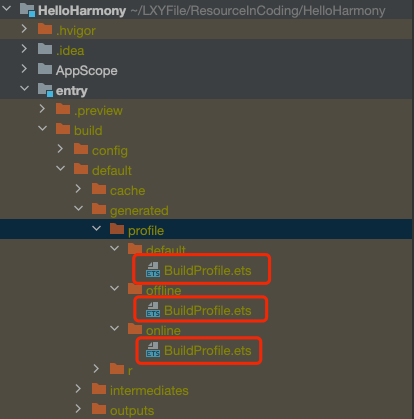
BuildProfile.ets文件内包含了各种编译参数:
/**
 * Use these variables when you tailor your ArkTS code. They must be of the const type.
 */
export const BUNDLE_NAME = 'com.example.helloharmony';
export const BUNDLE_TYPE = 'app';
export const VERSION_CODE = 1000000;
export const VERSION_NAME = '8.2.6'; // app.json5中配置的版本信息
export const TARGET_NAME = 'offline';
export const PRODUCT_NAME = 'default';
export const BUILD_MODE_NAME = 'debug';
export const DEBUG = true;
export const BUILD_NO = 1; // 自定义的编译参数

/**
 * BuildProfile Class is used only for compatibility purposes.
 */
export default class BuildProfile {
	static readonly BUNDLE_NAME = BUNDLE_NAME;
	static readonly BUNDLE_TYPE = BUNDLE_TYPE;
	static readonly VERSION_CODE = VERSION_CODE;
	static readonly VERSION_NAME = VERSION_NAME;
	static readonly TARGET_NAME = TARGET_NAME;
	static readonly PRODUCT_NAME = PRODUCT_NAME;
	static readonly BUILD_MODE_NAME = BUILD_MODE_NAME;
	static readonly DEBUG = DEBUG;
	static readonly BUILD_NO = BUILD_NO;
}
使用这些编译参数
// 会自动根据环境引入对应的BuildProfile.ets文件
import BuildProfile from 'BuildProfile'

function getBaseURL():string {

  // 使用BuildProfile.ets文件内的编译参数
  let target_name = BuildProfile.TARGET_NAME;
  console.log(`target_name = ${target_name}`);

  let baseUrl:string = "";
  if (target_name == "offline") {
    baseUrl = "http://159.75.169.224:3321/v3pz";
  } else if (target_name == "online") {
    baseUrl = "http://159.75.169.224:3321/v3pz";
  } else {
    baseUrl = "http://159.75.169.224:3321/v3pz";
  }
  return baseUrl;
}
二、自定义编译参数
我们可以在工程级别的build-profile.json5文件中自定义编译参数,如下所示:
{
  "products": [
    {
      "name": "default",
      "buildOption": {
        "arkOptions": {
          "buildProfileFields": {
            "BUILD_NO": 1
          }
        }
      }
    }
  ]
}
我们也可以在模块级别的build-profile.json5文件中自定义编译参数,如下所示(优先级高) :
{
  "buildOption": {
    "arkOptions": {
      "buildProfileFields": {
        "BUILD_NO": 1
      }
    }
  }
}
这就是我们在BuildProfile.ets文件内看到的
export const BUILD_NO = 1;
FAQ
一、如何在不修改build-profile.json5的情况下选择构建debug或release版本?
1、通过“Build”窗口进行编译构建时,默认“Build Hap(s)”为debug编译模式,“Build App(s)”为release编译模式,同时,用户也可以自主选择编译模式为debug或release。
2、开发者可以在DevEco Studio中选择相应的编译模式,选择之后,将按开发者所选的模式进行编译,即开发者选择的优先级大于默认的优先级
二、如何判断当前应用程序是Debug包还是Release包
import BuildProfile from ‘BuildProfile’;
在编译构建时,Hvigor会生成BuildProfile类,可以通过该类在运行时获取编译构建参数,BuildProfile.BUILD_MODE_NAME即为编译模式。
行者常至,为者常成!